Automating updates on Debian
Debian is a good operating system. Forming the basis for Ubuntu, Kali Linux and many others it is one of the most stable operating systems out there.

In this post, I will go over how to configure automatic security updates on Debian, which are not enabled by default.
Introduction
Debian uses the apt package manager. A system update is done with the
following commands:
$ apt update
$ apt upgrade
The importance of security updates
Security updates contain fixes for security vulnerabilities. They are an overlooked protection measure against many attacks.
In 2017 there was a ransomware attack named Wannacry. All the infected computers had one thing in common. They weren’t updated.
Updating a system regularly can prevent lots of attacks.
Why Automate?
Performing manual updates is repetitive and can be a huge burden to system administrators.
Setting up automatic updates
First update the package list.
$ apt update
Install these 2 packages
$ apt install unattended-upgrades apt-listchanges
Perform a quick configuration
$ sudo dpkg-reconfigure -plow unattended-upgrades
At this point, automatic upgrades have been configured and will run every 24 hours.
Automatic reboots
The next thing is to set up automatic reboots. Some updates such as those to the Linux kernel require a reboot.
1. With a text editor open the unattended-upgrades configuration file.
$ vim /etc/apt/apt.conf.d/50unattended-upgrades
2. Uncomment the line with Automatic-Reboot and set it to True.
Unattended-Upgrade::Automatic-Reboot "true";
3. This step is not neccesary but makes updates predictable.
Unattended-Upgrade::Automatic-Reboot-Time "23:00";
Commented lines are those that start with two slashes // , remove the slashes
to uncomment the lines.
// This line is commented
This line is not commented
Live Patching
If server uptime is important to you, a good solution is Livepatch by Cannonical, the company behind Ubuntu. It is free for up to 3 devices.
Livepatch allows you to install some critical kernel security updates without rebooting your system, by directly patching the running kernel. … It’s mainly intended for servers which are supposed to have months and years of continuous uptime without reboots
More info on kernel live patching.
Alerts on update failure
Debian is a very stable OS, however, updates can fail when using software that is not in the official repos. When that happens you will want to receive an alert.
I will be setting up email alerts in case of update failure.
Configuring unattended-upgrades to send email
- With a text editor modify the following lines in the
unattended-upgradesconfiguration file
$ vim /etc/apt/apt.conf.d/50unattended-upgrades
- Uncomment and modify these lines.
Unattended-Upgrade::Mail "your@email.address";
Unattended-Upgrade::MailOnlyOnError "true";
Setting up postfix to send email
To send the email alerts you need a working email setup. For this, I will be using postfix to send email from a Gmail account
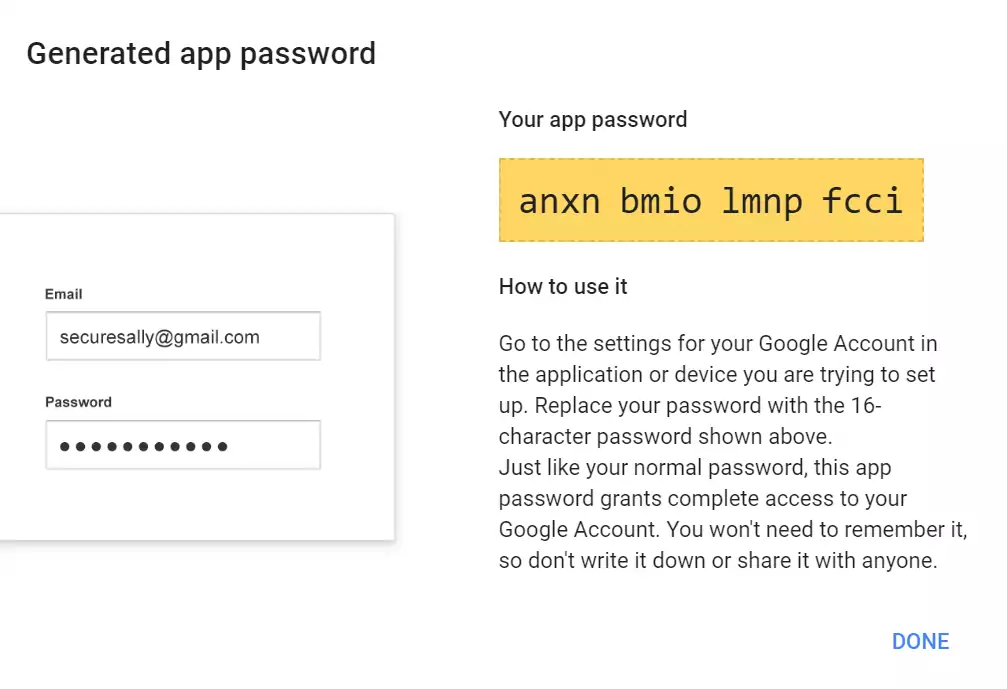
Create an app password
If you use Gmail, a good way to control access is by using app passwords. I use this method because I can revoke app passwords in case of compromise.
An App Password is a 16-digit passcode that gives a non-Google app or device permission to access your Google Account
- To create an app password, go to the Google account security page while signed in.
- Under Signing into Google , Select App Passwords
- Generate a custom App password, name it to something relevant like server-x email alerts and copy it. We’ll need it later.
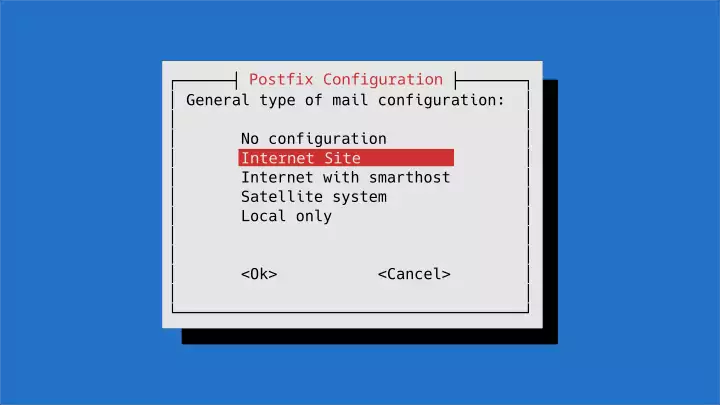
Install and Configure Postfix
The next thing is to install Postfix and other required packages. They are required to send emails using the app passwords we just created.
- Install
postfix,libsaslandbsd-mailx
$ apt install postfix libsasl2-modules bsd-mailx
When prompted, select Internet site.
Configure postfix
The first step is to configure postfix. Follow these steps.
- Open the postfix configuration file.
$ vim /etc/postfix/main.cf
- Find the line with
relayhostand add this.
relayhost = [smtp.gmail.com]:587
Set up TLS
The next step is to configure TLS. It stands for Transport Layer Security This ensures the email contents and credentials are encrypted in transit.
- Open the postfix configuration file.
$ vim /etc/postfix/main.cf
- Append the following lines to the end of the file
# Enable SASL authentication
smtp_sasl_auth_enable = yes
# Disallow methods that allow anonymous authentication
smtp_sasl_security_options = noanonymous
# Location of sasl_passwd
smtp_sasl_password_maps = hash:/etc/postfix/sasl/sasl_passwd
# Enable STARTTLS encryption
smtp_tls_security_level = encrypt
# Location of CA certificates
smtp_tls_CAfile = /etc/ssl/certs/ca-certificates.crt
Set up the credentials
The next step is to configure postfix to use the Gmail app passwords we have created.
- Open
/etc/postfix/sasl/sasl_passwd
$ vim /etc/postfix/sasl/sasl_passwd
- Add the following contents
[smtp.gmail.com]:587 yourusername@gmail.com:password
- Generate the password database
$ postmap /etc/postfix/sasl/sasl_passwd
Secure the credentials
By default, the files containing the email credentials are readable by everyone. We can change this.
- Modify the permissions so that the root user owns them with
chown
$ sudo chown root:root /etc/postfix/sasl/sasl_passwd \
   /etc/postfix/sasl/sasl_passwd.db
- With
chmod, change the permissions so that only root can the file.
$ sudo chmod 0600 /etc/postfix/sasl/sasl_passwd \
    /etc/postfix/sasl/sasl_passwd.db
- Restart Postfix
$ systemctl restart postfix
Test the email setup
- Send yourself a test email from the terminal
$ echo "Test completed" | mail -s “Test From server” your_email@gmail.com
If the email is received, then congratulations. The email setup is comlete. You now have:
- Automatic daily updates
- Automatic reboots
- A feedback system incase updates fail
Image Credits
Illustrations from Stories by Freepik